CAD Help Center

CAD Problems? Search here.........

Thursday, April 15, 2010

Step by Step Installation Process of Catia V6R2009 x64 bit on Windows XP x64 bit.

Dear CAD HELP CENTER readers as we all know that Dassault Systemes already released the new CAD platform named Catia V6R2009 and Catia V6R2010 (both in x32 bit and x64 bit) which is a combined bundle of multi modules includes Solid Modeling, Sheet metal Designing, Surface Designing, Digital Mock-Up (DMU), Kinematics, Finite Element Analysis, Machining, Equipment & Systems, Logic Designing and many more.....

The most advantages and must needed feature of Catia V6 is inbuilt PLM version 2. Yes this one have inbuilt PLM so that you will not bother anymore for any file management issues or linking problems.

So here in this post I am describing my experience of installation of Catia V6R2009 x64 bit on my desktop computer in Windows XP Professional x64 Edition Service Pack 2.
The same can be checked in the below picture.


As mentioned above this is a x64 bit version of Catia V6R2009 and it can be only installed on x64 bit operating systems means Windows XP x64, Windows Vista x64 and Windows 7 x64.

Here I have installed in only Windows XP professional x64 bit and hope that it will also work in other x64 bit Windows.

After complete installation of Catia V6R2009 x64 bit on my computer I realize that the overall process of installation is easy but some of the third party applications required before starting installation. These third party software's are needed to be preinstalled on your machine or computer. Here are a list of supporting software's required before installing:

  1. Microsoft Core XML Services version 6 component (MSXML6) : you can download this from http://www.microsoft.com/downloads
  2. The second one is Java version 5 or Higher : http://java.com or Download Java Runtime Environment 64-bit here 
  3. Microsoft .NET Framework 3.0 (or higher).or Download Microsoft .NET Framework 3.0 (or higher) 
After installation of these above applications you can start installation of Catia V6R2009 x64 bit.
First of all mount the DVD in the drive and run the setup.exe.


Here if you have not installed the MSXML6 on your machine or computer, setup will show you the error screen like below:


After installation of MSXML6 setup will show you the welcome screen of Catia V6 Installation.On welcome screen click next button.


On next screen setup will ask you for a nodelock license key. If you have then press import certificate and complete the process. Then click next button.


Choose destination folder for installation. The default one will be like C:\Program Files\Dassault Systemes\B205 or you can choose your own location.Then click next button.


As there is not any directory like mentioned above so you have to create a directory as shown below. Click on YES and then click next button.


Then define or choose Environment Location. The default one will be like C:\Documents and Settings\All Users\Application Data\DassaultSystemes\CATEnv


Keep it as it is and click next button. This will ask you to create Environment Directory, click on Yes button and then click next button.


 In setup type select Complete and click next button.


During Video MJPEG Codec check mark the button to install the codec and click next button.


Keep the Communication Port same as recommended and click next button.


Then it will ask you to define JAVA directory, then give the java home path like C:\Program Files\Java\jre6 


where you have installed the JAVA 6 and click next button.


Select the shortcuts you want and click next button.


Then Setup will show you the files to be copied. if you want to modify anything then you can click on back button and make the modifications. If you want to continue then click on Install button.


Then you will see a summery of all the information you provided during installation. Click on Install button.


Now Setup will start the installation. 


Just wait for completion and click on Finish button (Uncheck the launch Catia V6R2009 now)


Copy JS0GROUP.dll (From Crack/JS0GROUP.dll) and overwrite the original one in the following folder: C:\Program Files\Dassault Systemes\B205\win_b64\code\bin

Now Run the Catia V6R2009. This will show you an error of license manager as shown below.

Now select at least one configuration or product from the available list and restart the session to take settings into account.


To run CATIA V6R2009 you have to point so called Provider Data Source. It may be 3D XML, Enovia or Smart Team databases.

For example (choosing 3D XML) press More->Add New Connection.


During add connection choose Connection Type as the '3DXML' and click on next button.

 
and for 3D XML path choose this path and click finish button:
C:\Program Files\Dassault Systemes\B205\win_b64\resources\3DXMLModels\Sample.3dxml


Now click on the OK button on data source dialog box.Now you will see connect screen.
Please check the data source path (This will be) as below:
C:\Program Files\Dassault Systemes\B205\win_b64\resources\3DXMLModels\Sample.3dxml (3DXML) 

and then click on OK button:    


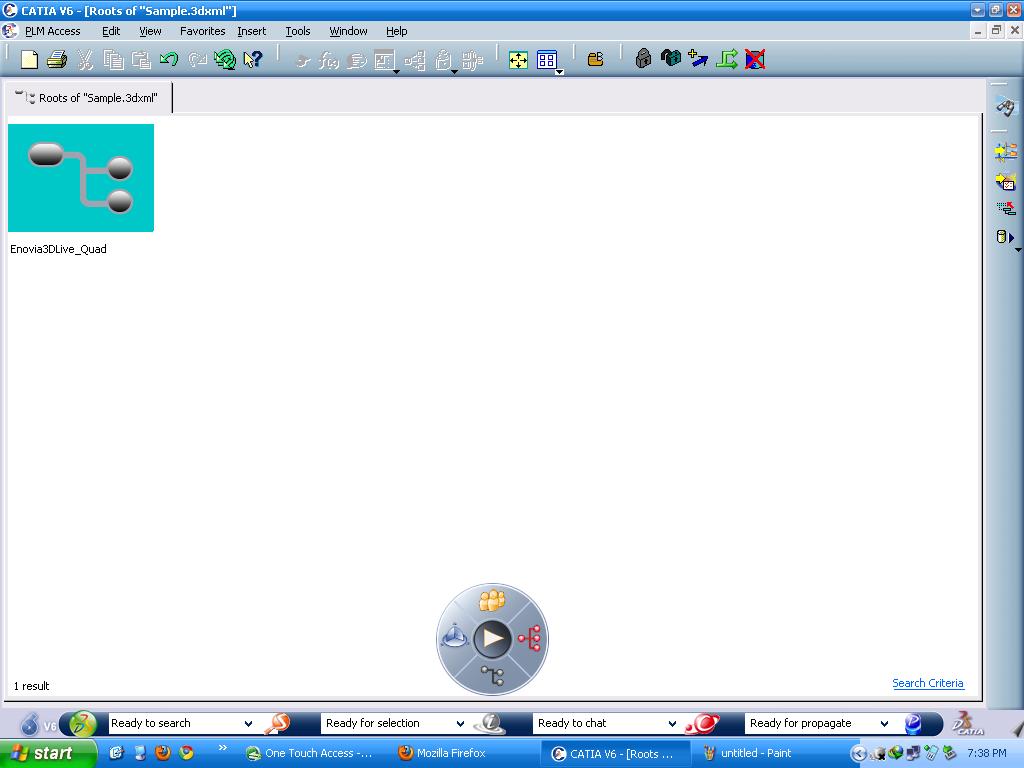
After this you will see the Root of Sample.3DXML screen, here you can browse the existing Enovia3DLive_Quad product.


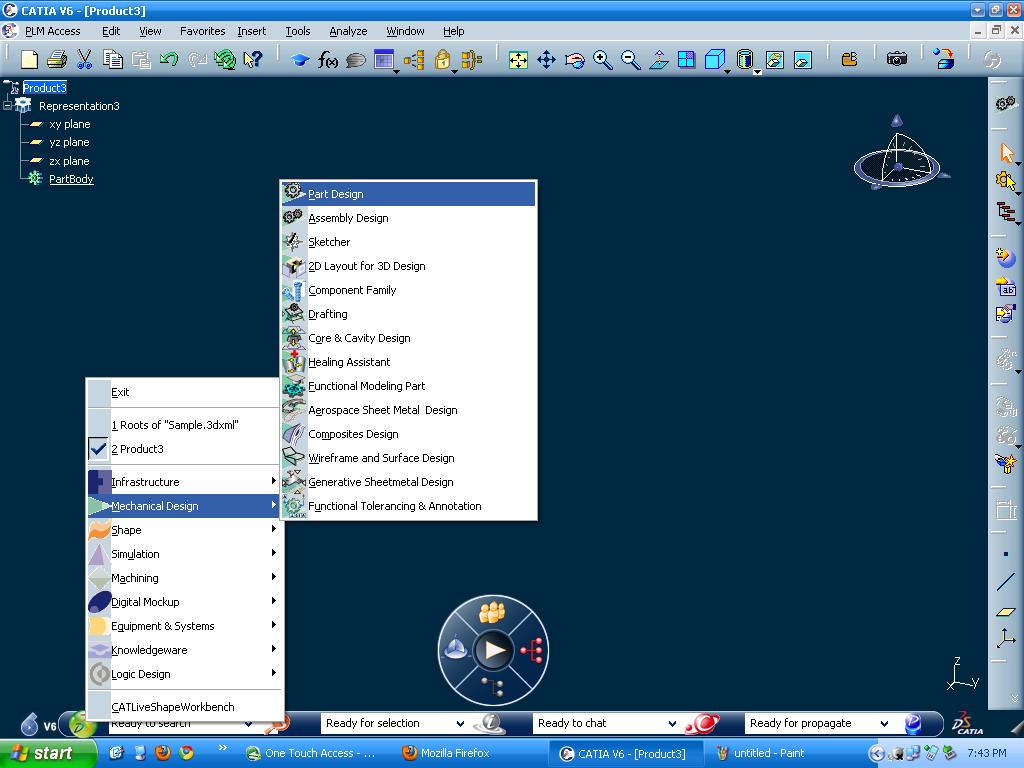
or you can create your own new product by clicking on new button or via PLM Access menu.Select the product type you want to make (like Mechanical Product) and click on Next button.


In Mechanical Product Tab Select Product or 3D Shape. Here Product Means new assembly or product and 3D shape means Part if we compare it with earlier versions of Catia till V5R20. Then give a part number and description and click on Finish Button.


Now you are ready to make any new product which can be a single representation or have multiple representations. You can go in Feature or sketcher mode via double clicking on representation or part body.
If you want to change the module then click on the 3DS Icon or button on lower left corner in light green color. you can swap visible space by clicking on the fold icon on right hand lower corner beside 3DS Catia logo.


One noticeable thing in Catia V6 is the there are no more parts. There are only representations and products.

Hope that this will help you to install and understand the new version of CATIA V5R2009 with PLM Version 2.0

If any query or feedback or suggestion, then let me know via comments.

CAD Help Center Updates

Wednesday, April 7, 2010

Unigraphics Hot keys to increase user performance

Hi dear all,
Sometimes you can work faster with your personal computer or laptop key-board then the mouse if you know the short cut keys. Same as in the other programs CAD software's also have their hot keys. Here are the hot keys or you can say key-board short cut keys of unigraphics (UG). Hope that this will help a lot to improve your software understanding and working.

Edit-Undo List-Invalid menu entry             Ctrl+Z               UG_EDIT_UNDO                            
Edit-Cut                                      Ctrl+X               UG_EDIT_CUT                             
Edit-Copy                                      Ctrl+C               UG_EDIT_COPY                            
Edit-Paste                                    Ctrl+V               UG_EDIT_PASTE                           
Edit-Delete...                                Ctrl+D                UG_EDIT_DELETE                          
Edit-Selection-Top Selection Priority - Feature F UG_SEL_FEATURE_PRIORITY          
Edit-Selection-Top Selection Priority - Face  G UG_SEL_FACE_PRIORITY                    
Edit-Selection-Top Selection Priority - Body  B UG_SEL_BODY_PRIORITY                    
Edit-Selection-Top Selection Priority - Edge  E UG_SEL_EDGE_PRIORITY                     
Edit-Selection-Top Selection Priority - Component C UG_SEL_COMPONENT_PRIORITY
Edit-Selection-Select All                     Ctrl+A               UG_SEL_SELECT_ALL                       
Edit-Blank-Blank...                            Ctrl+B               UG_EDIT_BLANK_SELECTED                  
Edit-Blank-Reverse Blank All                  Ctrl+Shift+B         UG_EDIT_REVERSE_BLANK_ALL
Edit-Blank-Unblank Selected...                Ctrl+Shift+K         UG_EDIT_UNBLANK_SELECTED
Edit-Blank-Unblank All of Part                Ctrl+Shift+U         UG_EDIT_UNBLANK_ALL_OF_PART
Edit-Transform...                             Ctrl+T               UG_EDIT_TRANSFORM                        
Edit-Object Display...                        Ctrl+J               UG_EDIT_OBJECT_DISPLAY                  
View-Operation-Zoom...                        Ctrl+Shift+Z         UG_VIEW_ZOOM                            
View-Operation-Rotate...                      Ctrl+R               UG_VIEW_ROTATE                          
View-Operation-Section...                     Ctrl+H               UG_VIEW_SECTIONING                      
View-Layout-New...                             Ctrl+Shift+N         UG_LAYOUT_NEW                           
View-Layout-Open...                           Ctrl+Shift+O         UG_LAYOUT_OPEN                          
View-Layout-Fit All Views                     Ctrl+Shift+F         UG_LAYOUT_FIT_ALL_VIEWS                 
View-Visualization-High Quality Image Ctrl+Shift+H         UG_VIEW_HIGH_QUALITY_IMAGE
View-Information Window                                       F4   UG_VIEW_INFO_WINDOW
View-Current Dialog                          F3                   UG_VIEW_CURRENT_DIALOG
View-Reset Orientation                        Ctrl+F8              UG_VIEW_RESET_ORIENTATION
Format-Layer Settings...                       Ctrl+L               UG_LAYER_SETTINGS                       
Format-Visible in View...                     Ctrl+Shift+V         UG_LAYER_VIEW                           
Format-WCS-Display                                               UG_WCS_DISPLAY                          
File-New...                                   Ctrl+N               UG_FILE_NEW                             
File-Open...                                  Ctrl+O               UG_FILE_OPEN                             
File-Save                                     Ctrl+S               UG_FILE_SAVE_PART                       
File-Save As...                               Ctrl+Shift+A         UG_FILE_SAVE_AS                         
File-Plot...                                  Ctrl+P               UG_FILE_PLOT                            
File-Execute-Grip...                         Ctrl+G               UG_FILE_RUN_GRIP                        
File-Execute-Debug Grip...                     Ctrl+Shift+G         UG_FILE_RUN_GRIP_DEBUG                  
File-Execute-NX Open...                       Ctrl+U               UG_FILE_RUN_UFUN                        
Tools-Expression...                           Ctrl+E               UG_INSERT_DLEXPRESSION                  
Tools-Journal-Play...                         Alt+F8               UG_JOURNAL_PLAY                         
Tools-Journal-Edit                            Alt+F11              UG_JOURNAL_EDIT                          
Tools-Macro-Start Record...                   Ctrl+Shift+R         UG_MACRO_RECORD                         
Tools-Macro-Playback...                       Ctrl+Shift+P         UG_MACRO_PLAYBACK                       
Tools-Macro-Step...                            Ctrl+Shift+S         UG_MACRO_STEP                           
Preferences-Object...                         Ctrl+Shift+J         UG_PREFERENCES_OBJECT                   
Preferences-Selection...                      Ctrl+Shift+T         UG_PREFERENCES_SELECTION                
Information-Object...                         Ctrl+I               UG_INFO_OBJECT                          
Analysis-Curve-Refresh Curvature Graphs Ctrl+Shift+C         UG_INFO_MB_SHOW_GRAPHS                  
Application-Modeling...                       Ctrl+M               UG_APP_MODELING                         
Application-Shape Studio...                   Ctrl+Alt+S           UG_APP_STUDIO                           
Application-Drafting...                       Ctrl+Shift+D         UG_APP_DRAFTING                         
Application-Manufacturing...                   Ctrl+Alt+M           UG_APP_MANUFACTURING                    
Application-Sheet Metal-NX Sheet Metal Ctrl+Alt+N           UG_APP_SBSM                             
Application-Gateway...                        Ctrl+W               UG_APP_GATEWAY                          
Help-On Context...                           F1                   UG_HELP_ON_CONTEXT                      
If  you have any suggestion or feedback, then let us know.
CAD Help Center Updates