CAD Help Center

CAD Problems? Search here.........

Sunday, August 16, 2009

Install UG NX 6 x32 bit in Windows 7 x64 bit.(Step by Step Guide)

From a long time the readers of CAD Help Center are still searching the solution for installation process of Unigraphics (UG NX 5 or NX 6) in Windows Vista (x32 or x64 bit).

After a long time now I have got a chance to try to install and see the errors while installation or running the UG NX 6 in Windows 7 x64 bit. I was unable to get Windows Vista to try out the UG NX 5 or NX 6, but I have seen that the Windows 7 is up-gradation in Windows Vista.

This is not the final version of Windows 7 but I have got a Genuine copy of this Windows 7 Ultimate x64(Check the screen shot).Can say best ever operating system till today. This is ultra fast to work like copy, paste, installation or uninstallation of a programs,Graphics and other features.


I hope that if the UG NX 6 is running in Windows 7, it will also work in Vista in both.(32 or 64 bit).And also UG NX 5 will work like this in Vista.


So here i am writing the procedure of how I install UG NX 6 and configured license file and others files.
  • Mount or Open the Image in Image Drive. (like Nero or Ultra ISO)
  • Auto Play will start Installation Automatically.
  • If Auto Play will not work then open the Image Drive and Double click on Launch file.
  • First of all install the License Server.(This is same as in my previous Post : See here )
  • Note that in all versions of x64 bit Windows, if the software you are installing is x32 bit, this will be installed by default in Program files (x86) like. (C:\Program Files (x86)\UGS\UGSLicensing\)
  • After finishing the installation of License Server click on Install NX.


  • Select English(United States) as setup Language or select as of your Windows Language.
  • Installation will begin and ask you for Setup Type select Typical and click Next.
  • Choose Destination Folder as per your own choice. By default it is (D:\Program Files (x86)\UGS\NX 6.0\) . After Destination Folder selection click on Next.
  • Select the NX Language as your Operating System or Windows Language.
  • Then if you are ready to install the program click Install or if you want to modify any setting then click Back.
  • This will start the installation of the program on your Computer. Just wait till the installation wizard Install UG NX 6.
  • After installation finish run UG from program list or restart your computer and run UG from program list.
If you are installing from the image downloaded by torrent, you have to follow the installation steps provided with the crack, like copy the over cracked files etc.
  • The UG NX 6 will work fine in Windows 7 x64 bit as shown below.


Hope that this will help you to run this great software in a great Windows.

Let me know if you have any issue during installation or running.

Want to make free worldwide calls. Try this.

Saturday, August 8, 2009

Drafting Shortcut & Symbol for I-DEAS for better Productivity

I know that I-DEAS software have not any future and any further development was stopped, but if you are a regular or ex user of this master software then there are some useful tips for you.

There are the Drafting Shortcut & Symbol for I-DEAS software. These can be used as Tips for better or fast working or you can say if you have knowledge of these shortcuts you can finish your task in a very productive way. So try them if you are a regular user of I-DEAS.


Using Special Symbols

You can use special symbols in your drawing, including Greek symbols, international characters, and special numbers. Most of these are generated by preceding a keyboard entry with "@" , which is defined as a special character flag.

When your cursor is in an alphanumeric field, there are three predefined keys that don't require an "@" symbol for access:

\ (the "backslash" character) displays as a plus/minus sign (also jumps fields)

| (the "pipe" character) displays as a diametral (Ø)

' (the "backquote" character) displays as a degree (°)

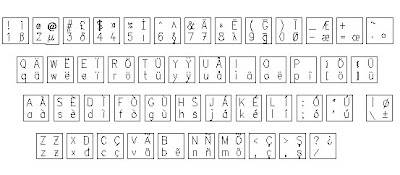
The following figure shows, on the right side of each key, the Simplex font special symbols
available:


The following figure shows, on the right side of each key, the Greek font special symbols available:

Note: IGES 1001, IGES 1002, and IGES 1003 text fonts don't support these special symbols.

Using the @ Symbol

To use the special symbols, enter @ before pressing the special symbol. @ initiates the special symbol keyboard.

Note: You can use Shift-F7 to produce the @ symbol.

For example, to use the Greek letter mu, press @ (or Shift-F7) and then 2. The @2 text string appears in the prompt area, but the symbol mu appears on the drawing.

To use a symbol on the top, right of a key, press @, the Shift key, and then the symbol. The @ symbol is not used with the predefined keys unless you want them to appear in their original form. To use the @ in a string rather than initiate a special symbol, enter @@.

@ and backslash symbols work as follows:

  • if you type "\" you get "±"
  • if you type "@ \" you get \
  • if you type "@@" you get "@"
  • if you type "@@ \" you get "@±"

Special Usage Note for German and Swedish Characters

German and Swedish umlauts and the German estset character display correctly when they're constructed using @ combinations. However, when they're input directly with keyboard mapping, they will only display correctly if the following X default setting exists in the .SDRC_IDEAS file:

Main*allow_umlauts: FALSE

IGES Fonts for CADAM-Read Mapping

Most I-DEAS Drafting text fonts can be mapped to the CADAM special characters. The text fonts covered are:

  • IGES 1001
  • IGES 1002
  • IGES 1003

IGES 1001 Text Font

This keyboard layout shows the standard characters and symbols associated with the IGES 1001 text font. All lowercase alphabetic characters will be printed as something else. For example, a lowercase r is printed as a concentricity symbol:


IGES 1002 Text Font

This keyboard layout shows the standard characters and symbols associated with the IGES 1002 text font. All lowercase alphabetic characters will be printed as something else. For example, a lowercase r is printed as a right arrow:

IGES 1003 Text Font

This keyboard layout shows the standard characters and symbols associated with the IGES 1003 text font. All lowercase alphabetic characters will be printed as something else. For example, a lowercase r is printed as a concentricity symbol:


Hope that this will be helpful to existing and new users of I-DEAS. software.

Want Make Free Worldwide phone calls?

click here to join for this offer.


Tuesday, July 28, 2009

UG NX 6 INSTALLATION STEP BY STEP GUIDE IN XP x32 BIT

This tutorial is spacial for UG NX 6 (also works with UG NX 5), and describe the step by step process of license configuration and installation.

First of all let's see how to edit license file for our personal computer. This include host name and port value setting in license file.

  1. Open license file with notepad.
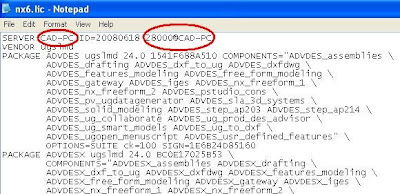
  2. Change this_host with your computer name. for example my computer name is CAD-PC. (Know your Host Name, Computer Name, Host-ID etc.)
  3. Set port value 28000@Host Name.

All these are shown in picture below for example.


After completion of license file editing, start installation of UG.

  • First of all start installation of license server.


  • For language select English (United States) and click Next.
  • Select installation folder for license server and click next. (Default is Like C:\Program Files\UGS\UGSLicensing\ ). Keep the Default.
  • After that this will ask you the location of license file. Click Browse and select the license file which you edited and click Next.
  • It will ask you to start installation. Select install.
  • This will install the license server on your computer.
Thereafter start the Installation of Unigraphics NX 6 software :

  • Click on Install NX.
  • For language select English (United States) and click Next.
  • During Setup type select Typical and click Next.
  • Destination Folder : keep default or you can select other as you wish. click Next.
  • During licensing it will ask you to enter server name. This will be like 28000@cad-pc for my PC or 28000@Your Host Name for your computer.
  • If server name is correct as described above then click Next.
  • For language select English or choose as per your requirement click Next.
  • After that it setup will ask you to review or change the installation setting.
  • If the setting is OK then click Install or if anything wrong then click back and repeat the above process to reset all. (Hope that everything will be OK)
  • After installation finish run UG from program list or restart your computer and run UG from program list.
If you are installing from the image downloaded by torrent, you have to follow the installation steps provided with the crack, like copy the over cracked files etc.

There is nothing to do anything else, your program will work file like as shown:


CAD Help Center Updates

Sunday, July 5, 2009

Give Your Windows PC a Boost for CAD or FEA Program

Its not only thinking, its a realty and i have realized it on my personal computer. eBoostr is a program who boost my PC.

I have a PC with P4 2.66 GHz Dual Core and 1 GB RAM.

I was facing little problem of speed when working on my favorite programs. But now i am very confidant and tension free about performance of my Computer, because its working very fine.

The main benefit of this program is increase in PC performance when using any CAD or FEA program.

So i just only say that lets try this at least once and its totally free of cost. This may can also save your money to buy a hi fi configuration Computer or Laptop.

Its main benefit are you can use this program with any type of memory or with Computer or Laptop.

System Requirements for this program:

* Windows Vista, Windows XP, Windows 2000*, Windows 2003 Server, Windows 2008 Server, Windows 7 RC (all 32 and 64 bit systems supported)
* USB 2.0 port version or memory card reader
* Flash drive or memory card with at least 2.5 MB/sec random read speed

* Windows 2000 Service Pack 4 and Update Rollup 1 for SP4 are required.

You can download full featured version here.


The trial version have some time limitation, but i think these are not a problem when using this great program in trail mode because the trial version has no time expiration(license) and you can evaluate it for as long as you wish. However the product demo is fully functional only for 4 hours after each system boot. This will allow you to evaluate the product and estimate how it performs on your configuration. After 4 hour just restart your computer or laptop and the feature is ready for use. By doing this you can save your lot of time.

We all know that after 4 hour we all just taking tea or coffee, lunch or dinner etc. so during this time you can reboot your system.

But when you are running a FEA program check that if your simulation will completed in 4 hour or it will take some more time?
If its a time taking simulation then you just try out this program and check whether its beneficial for you or not?
If yes then buy its full version.

So lets test drive this utility and leave your feedback for others.

CAD Help Center Updates

make 100% free phone call to anywhere in the world


Saturday, May 23, 2009

Step by Step Process to Configure License File & License Server for Ansys 10 or Higher Versions.

Hi again i am here to describe you the steps for "how to configure the license server and license file for ansys 10 or upper versions". When you download software via torrent, you will find a folder named crack or magnitude in the CD or DVD image.

  • Open the image file via any image drive. (like Nero or Ultra ISO)
  • Copy crack or magnitude folder to your local drive (like D: or E:)
  • Here you will find 4 files in magnitude folder like shown below.

  • Open ansys.dat with "notepad". (right click on ansys.dat and select open with ,then select notepad and click OK)
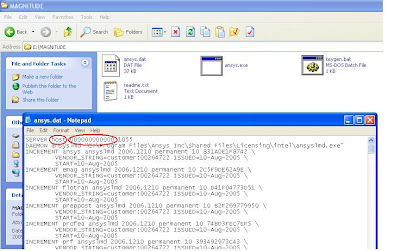
  • Run the keygen.bat file which will create a license.dat file in magnitude folder.
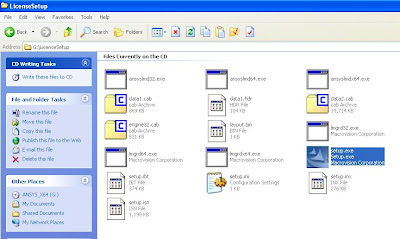
  • Run setup and Install the license server as a single server. When prompted for a license file point the browser to the license.dat created in above steps.
  1. Run Setup.exe


This will ask you
"Is this license server machine?"
: click on Yes.


The next step will ask you "Do you have a license file to enter during installation? : click on Yes.


Installation will begin.


Copy the license file created via above steps to folder "C:\Program Files\Ansys Inc\Shared Files\Licensing". Do this copying when the installation process will ask you the license file.


Then select browse the license file and select the license file created via above steps from location "C:\Program Files\Ansys Inc\Shared Files\Licensing".


The System will configure the license file for ansys.


Click on finish.

  • Then Set the license environment variables:

    ANSYSLMD_LICENSE_FILE = 1055@host (host being your computer name)
To do this Right click on My Computer ->Properties-> advance tab -> environment variables. click on New tab

in variable name write ------ANSYSLMD_LICENSE_FILE

in variable values write -----1055@COMPUTER Name

(for more info on how to set environment variables check this for example :
ENVIRONMENT VARIABLE and Port Value Problem Solution

Now you installed the license file and license server properly on your computer. After the above process install the Ansys 10 or higher version on your computer. Reboot your system. That will work fine.

Note: You must have the CAD software pre-installed for the plugins to be available for installation.

Hope that your problem will be solved now.


CAD Help Center


Sponsored Ads,

Friday, May 22, 2009

SolidWorks Video Tutorials 2007-2009 (Step by step) For Beginers

Hi all there I found some of good Video Tutorials for SolidWorks 2007-2009 and happy to share with you. Hope that this will help you to learn more and shape your carrier.

These Tutorial Covers the following mostly all features of SolidWorks software including :
  1. Introduction.
  2. Surfacing.
  3. Weldments.
  4. Mold Design.
  5. Sheet Metal.
  6. New in 2009.

Introduction includes the following features tutorials:
  • Basic
  • Interface
  • Tangent Arc
  • More on Extrusion
  • Sample Hole
  • Complex Extruded Cut
  • Hole Wizard
  • Shell
  • Section View
  • Constant Radius Fillet
  • Variable Radius Fillet
  • Face Fillet
  • Full Round Fillet
  • FilletXpert
  • Chamfer
  • Revolved Feature
  • Revolved Cut
  • Mirror Feature
  • Apply Color
  • Apply Texture
  • Apply Material
Surfacing include the following features tutorials:
  • Curvature Options
  • Zebra Strips
  • Geometric Continuity
  • Extruded Surface
  • Surface Trim
  • Boundary Surface
  • Fillet
  • Project Curve
  • Thicken
  • Half Pipe Connection
  • Sketch (cross-Connection)
  • Pipe (Cross-Connection)
  • Filled Surface
  • Lofted Surface
  • Swept Surface
  • Swept Twist
  • Swept (Follow Path)
  • Planer Surface
  • Face Curves
  • Intersection Curves
  • Offset Surface
Weldments include the following features tutorials:
  • Structural Members
  • End Caps
  • Gusset
  • Fillet Bead
  • Trim Extend
  • Insert Part
  • Custom Profile
  • Sub-Weldment
  • Move-Copy
  • Extruded Cut
  • Configurations
  • Project (3D Sketch)
  • Project II
  • Cut List (Drawings)

Mold Design include the following features tutorials:
  • Move Face
  • Scale
  • Parting Line
  • Straddle faces
  • Undercut Detection
  • Parting Line II
  • Shut Off Surfaces
Sheet Metal include the following features tutorials:
  • Bend Allowance
  • Applying K-Factor
  • Bend Allowance/Deduction
  • Bend Table
  • Gauge Table
  • Creating Base Flange
  • Edge Flange
  • Trim Side Bends & Offset
  • Auto Relief
  • Costume Relief
  • Miter Flange
  • Hem Tool
  • Sketched Bend
  • Closed Corner
  • Jog
  • Break Corner/Corner Trim
  • Break Flat Pattern
  • Tab
  • Lofted Bend
  • Extrude Cut
  • Simple Hole
New in 2009 include the following features tutorials:
  • Intro
  • Converting Files
  • GUI
  • Magnifying Glass
  • Appearance
  • Move / Copy
  • Equation Driven Curves
  • Numeric Sketch Input
  • Repair Sketch
  • Slot Entities
  • Sketch Sketch Geometry
  • Use Blocks in Sketches
  • Missing Sketch Entities
  • Missing References
  • Lip & Groove
  • Instant 3D in Assemblies
  • Instant 3D Live Section Planes
  • Mirrors & Patterns
  • Instant 3D Weldments
  • Solid Swept Cut
  • Measure Tool

To download Video Tutorials for SolidWorks 2007-2009 click here.

A BitTorrent client like uTorrent is required to download this link.

For all students :

I know you can't afford to buy original software from the company, but hope that you just use this help to help others and learning purpose only and not for any professional purpose.

and all professional please buy original one and get license to use as per your requirements.

and for professionals there is a further request :

Get help and provide help to beginners and students and help me to make this world of knowledgeable or experts CAD designers.

you can do this by leaving or providing free tutorials for any CAD software (Autocad, Solidworks, Catia, Unigraphics (UG), ProE, Ansys, Cosmos or any other package. If any of you want to post your tutorials here on CAD Help Center Blog then just mail me with your ID and info, so that i can post the same for you.

And please forward this to all students you know or your friends.

Lets Make a real helping World.

CAD Help Center


Sponsored Ads,


Works best on Firefox 3 What's Firefox?

Monday, March 23, 2009

Know your Server Name, Host ID, Computer Name, Mac Address

Hi friends,

Here some of you are confused in these terms (Server Name, Host ID, Computer Name, Mac Address).

So don't be confused in these terms, because these all are related to nearly all CAD software's. But in UG we always use Server Name or Computer Name.

Some of you are confused for how to know Server Name or Computer Name for your personal computer or any other PC connected to any other network (LAN,WAN etc.)

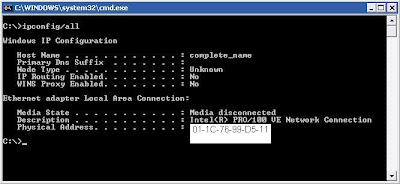
To know these above terms related to your PC follow these steps as shown in Pic also:

1. Open Command Prompt. (Run>cmd >enter)
2. Type ipconfig/all >enter.


Here Host Name is your Server Name or Computer Name. Like (Complete_Name)
Physical Address is your Host ID or Mac Address. Like (01-1C-76-99-D5-11)

Note that : Before installing any CAD package you should confirm that your PC have LAN Card driver installed.


and update the first line in your license file in your Pc like this :

Old one :

SERVER this_host ID=20080618 28000

New one :

SERVER prashanth ID=20080618 28000@prashanth

you will only need to replace this_host with your Server Name or Computer Name.
and add @Server Name or Computer Name after 28000 (port value)


For example for the details shown above in the picture, the first line will be like this:

SERVER Computer_name ID=20080618 28000@Computer_name


For further assistance please have a look at:

  1. UG license installation error solution
  2. Know your Computer Host ID
  3. UG license server error in UG NX5 and NX6
  4. License Server not Found Error Solution for UG NX Series
  5. ENVIRONMENT VARIABLE and Port Value Problem Solution
  6. INVALID (INCONSISTENT) LICENSE KEY OR SIGNATURE ERROR
Hope that your confusion will be solved.
So don't be tense, here is solution for your all CAD problems...........Have a nice day.....

CAD Help Center

Thursday, March 19, 2009

INVALID (INCONSISTENT) LICENSE KEY OR SIGNATURE ERROR

Hi dear friends,

First of all sorry for late reply to all. I am little bg in my other work, and secondly working on the problem commented by you.
(NX LICENSE ERROR: INVALID(INCONSISTENT) LICENSE KEY OR SIGNATURE,
THE LICENSE KEY/SIGNATURE AND DATA FOR THE FEATURE DO NOT MATCH")

now let me explain you my experience on this particular problem.
I myself failed to generate this error, tried too many tricks and methods.

But yesterday one of my friends (Amit) told me that he is facing a problem in ProE Wildfire 4 named:
INVALID (INCONSISTENT) LICENSE KEY OR SIGNATURE.

So i reached to his room to find out the reasons behind this error. after working on his PC and the processes to solve this error I was failed to find the real reason which generate this type of error,

But :

final result was satisfactory for us.

and he is happy because ProE Wildfire 4 is working on his PC, properly without any error.

now i don't know what mistake he has done but, I just uninstall the program and reinstall the same with proper license configuration method posted previously here on this blog.

So i will just suggest you that please uninstall the program via Add/Remove Program from your PC.

Reinstall the same software or program by following the proper method of configuration to configure the license file.

hope that your problem will be solved, if not then please let me know via comments.

and please leave some lines of your license file just like this, so that i can check is there any problem in lic. file or not :

SERVER Computer name ID=20080618 28000@
Computer name
VENDOR ugslmd
PACKAGE ADVDES ugslmd 24.0 1541F688A510 COMPONENTS="ADVDES_assemblies \
ADVDES_drafting ADVDES_dxf_to_ug ADVDES_dxfdwg \
ADVDES_features_modeling ADVDES_free_form_modeling \
ADVDES_gateway ADVDES_iges ADVDES_nx_freeform_1 \
ADVDES_nx_freeform_2 ADVDES_pstudio_cons \
ADVDES_pv_ugdatagenerator ADVDES_sla_3d_systems \
ADVDES_solid_modeling ADVDES_step_ap203 ADVDES_step_ap214 \
ADVDES_ug_collaborate ADVDES_ug_prod_des_advisor \
ADVDES_ug_smart_models ADVDES_ug_to_dxf \
ADVDES_ugopen_menuscript ADVDES_usr_defined_features" \
OPTIONS=SUITE ck=100 SIGN=1E6B24D85160
PACKAGE ADVDESX ugslmd 24.0 BC0E17025B53 \
COMPONENTS="ADVDESX_assemblies ADVDESX_drafting \
ADVDESX_dxf_to_ug ADVDESX_dxfdwg ADVDESX_features_modeling \
ADVDESX_free_form_modeling ADVDESX_gateway ADVDESX_iges \
ADVDESX_nx_freeform_1 ADVDESX_nx_freeform_2 \
ADVDESX_pstudio_cons ADVDESX_pv_ugdatagenerator \
ADVDESX_sla_3d_systems ADVDESX_solid_modeling \
ADVDESX_step_ap203 ADVDESX_step_ap214 ADVDESX_ug_checkmate \
ADVDESX_ug_collaborate ADVDESX_ug_kf_checker \
ADVDESX_ug_opt_wizard ADVDESX_ug_prod_des_advisor \
ADVDESX_ug_smart_models ADVDESX_ug_to_dxf \
ADVDESX_ugopen_menuscript ADVDESX_usr_defined_features" \
OPTIONS=SUITE ck=76 SIGN=1CCCD91207C0
PACKAGE ADV_MFG ugslmd 24.0 712F127D3EAC \


and I have one more request to all of you that please if anyone of you know regarding any error solution then please share it with others and help them.

Have a nice day.

CAD Help Center

Friday, January 16, 2009

ENVIRONMENT VARIABLE and Port Value Problem Solution

Hi Friends,

Here i am getting 2 or 3 mails daily regarding the problem of ENVIRONMENT VARIABLE and port value in UG NX Series (Unigraphics).

If any of you got errors listed below, than you are at right place and found solution.

Errors:
  1. log file in UGSLicensing saying that it could not open the port listed in the license file.
  2. NX LICENSE ERROR - NX REQUIRED THE ENVIRONMENT VARIABLE ugs_LICENSE_SERVER to be configured properly.
  3. The TCP port number in the license, 28000, is already in use.
  4. FLEXnet Licensing error:-125,147


so friends there is two solutions, one for UG NX 1-4 and Second for UG NX 5-6,

For UG NX 1-4 :

right click on My Computer ->Properties-> advance tab -> environment variables.
click on new tab

in variable name write ------UGII_LICENSE_FILE

in variable values write -----27000@COMPUTER Name


For UG NX 5-6 :

right click on My Computer ->Properties-> advance tab -> environment variables.
click on new tab

in variable name write ------UGS_LICENSE_SERVER

in variable values write -----28000@COMPUTER Name

See the print screen below :


Have a nice Day :)


CAD Help Center

Sunday, January 11, 2009

License Server not Found Error Solution for UG NX Series

Hello Dear All,

Again here i got mails from the blog readers having problems in installation of Unigraphics,Ansys,Pro Engineer etc.

During installation we need to configure License File via. License server installed in our Personal Computer(PC) or Laptop.

I have already posted the step by step procedure for License file Configuration here.

But either by user mistake or via improper method some of users will get the errors, that License Server not Found during configuration via lmtools.exe

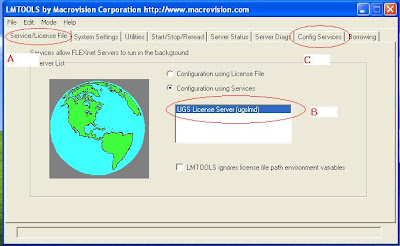
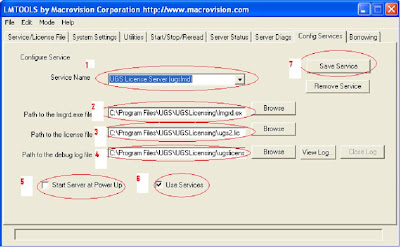
So here I am posting solution for that, open lmtools.exe that will show you the following image.

At step (A) Here in this image the UGS License Server is running properly (B)

if in yours this is not, then go to step (C) and create and save a new license server.


1. Here you will see the Service Name: UGS License Server (ugslmd)

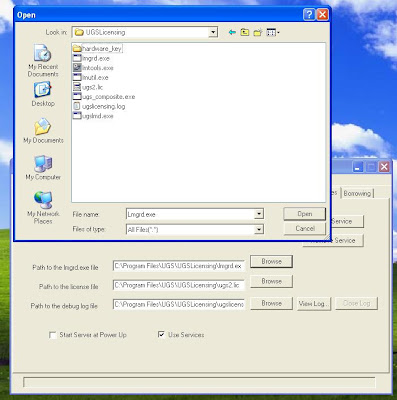
2. Click on browse and select the file lmgrd.exe in your PC : C:\Program Files\UGS\UGSLicensing\lmgrd.exe

3. Click on browse and select the license file in your PC : C:\Program Files\UGS\UGSLicensing\ugs2.lic

4. Click on browse and select the debug log file in your PC : C:\Program Files\UGS\UGSLicensing\ugslicensing.log

If debug log file is not there then create a text document and rename it with ugslicensing.log

5. Enable (Check mark) Start server at Power Up.

6. Use services same as shown.

7. Click Save Service.


Then restart the Computer and run lmtools.exe, check the status at (B) you will get UGS License Server.

Then go to my other post and configure license file via this UGS License Server.

For configuration in UG NX5 and UG NX6 click here

For configuration in UG NX4 to NX1 click here

Now enjoy and You can use the same procedure in Ansys or Pro Engineer or any other software which is using Lmtools license.


Visit to get Solution for Any kind of error related to CAD Software's.
CAD Help Center