Dear
CAD HELP CENTER friends
Wish you all a very very Happy New Year which is 2012. Hope that everything is fine at your ends. You all are preparing or making different plans for new year celebration. Its a long time that I have posted any new solution or made any reply to all my friends. I feel very sorry for this, but I think you can understand my situations. I was very much busy.
Now I got some time and here with a new solution or we can say a new reason to calibrate new year with UG NX 8.0 or you can say this is the gift from
CAD HELP CENTER for new year.
So friends what you are waiting just follow this guide which can start your new year with UG NX 8.0
As you all know that Siemens PLM Software is proudly introduced NX 8 in market in September 2011. From the same day everyone is in search to get this latest NX 8 with enhanced capabilities of HD3D tools & enhance Synchronous Technology and now I have got this and hope so you also have got it. The new version of UG NX 8.0 is available for both Windows x32 bit and x64 bit platforms.
The full package is a combined bundle of multi modules includes Solid Modeling, Sheet metal Designing, Surface Designing, Digital Mock-Up (DMU), Kinematics, Finite Element Analysis, Machining, Circuit Designing,
Mechatronics Concept Designer and many more.....
You are at right place if you are searching to get help regarding installation of Unigraphics NX 8.0 or can say Unigraphics NX 8. This guide will help you to install and configure license file for UG NX 8 x64 bit on Windows 7 Ultimate x64 bit. So get ready to know how to install or configure UG NX 8.0 in Windows 7 Ultimate x64 bit.
Here in this post I am describing my experience of installation of UG NX 8.0 x64 bit on my desktop computer in Windows 7 Ultimate x64 Edition Service Pack 1. First of all I want to share with you that whatever media I have got is saying that
Files on this media are intended for use on 64 bit Windows XP, Vista and Windows 7 platform only. So this is conformed that this will not work on any 32 bit machine having Windows XP x32 bit, Windows Vista 32 bit or Windows 7 x32 bit. After complete installation of
UG NX 8 x64 bit on my computer I realize that the overall process of installation is very easy and same as the earlier posted procedure for UG NX 7.0
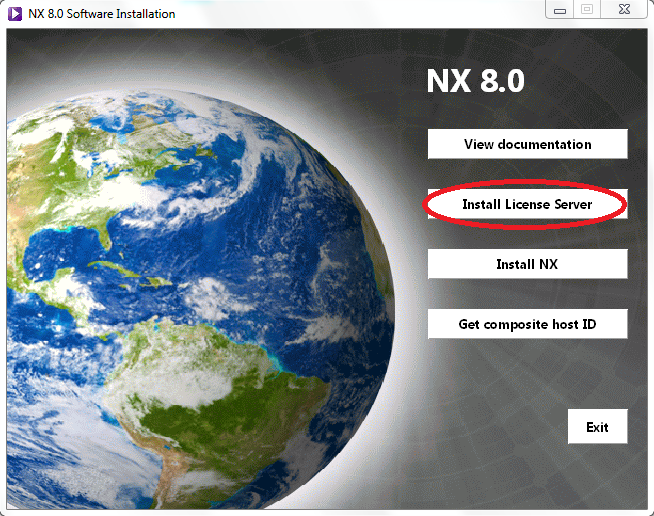
So First of all mount the DVD in the drive and run the
Launch.exe as shown above. This will Show you the NX 8.0 Software Installation menu as shown below. From here you can View Documentation, Install License Server, Install NX or can Get Composite Host ID.
Now click on Install NX. This will start the installation of Unigraphics NX 8 on your Computer or Laptop or Machine. Now you have to Choose Setup Language. The default language is English but you can select your choice.(Currently UG NX 8 is supporting Chinese Simplified & Traditional, English, French, German, Italian, Japanese, Korean, Russian and Spanish) This is only Setup Language.
Now you will see the
Welcome to InstallShield Wizard for UG NX 8.0.
Now Click on Next Button. This will Show you Setup Type Menu.
Select
Typical and
Click on Next button. and you will see the
Destination Folder Menu.
Keep the Destination Folder as it is and
Click on Next button. This will show you Licensing Menu and ask you to
Enter Server Name or a
License File.
This will be like
28000@cad-pc for my Computer or
28000@Your Host Name for your computer. You can check your computer name
Here. Then
Click on Next button This will show you
NX 8.0 Language Selection menu.
Select the Language in which you want to install the UG NX 8. This is the Language in which program will run after installation. English is Default one, you just select yours and then
Click on Next Button.
After that the setup will ask you to review or change the
Installation Setting. If the setting is
OK then click on
Install Button or if anything wrong then click back and repeat the above process to reset all.
After Clicking on Install Button the Setup will start Installing UGS NX 8.0.
After installing the Setup will show you the
InstallShield Wizard Completed. If you want to see the
Windows Installer Log then check mark the option and Click
Finish or if you don't then without check mark Click on
Finish.
Now you have to Configure your License File to run the UG NX 8.0, so for this you have to install License Server first and then you can do the License Configuration.
To install License Server for UG NX 8.0 you have to click on
Install License Server as shown below.
This will start the installation of Unigraphics NX 8 License Server on your Computer or Laptop or Machine. Now you have to Choose Language for the Installation. The default language is English but you can select your choice from the available list.
Now
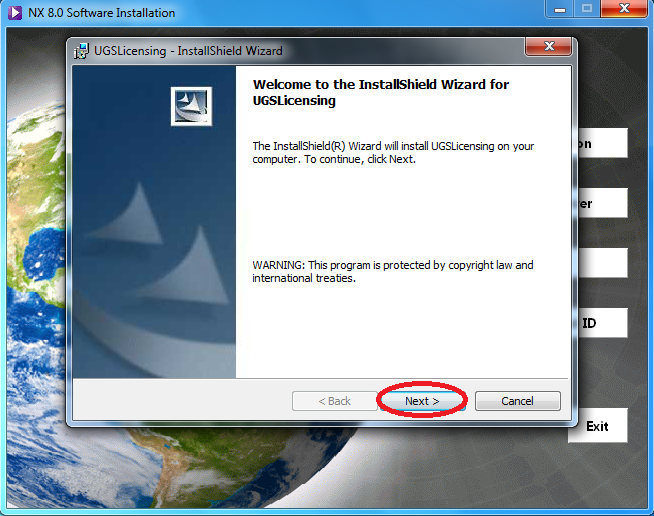
Click on OK button and the Installation of License Server will begin and will show you the below Screen. Just
Click on Next Button.
After this Setup will ask you for
Destination Folder where you want to install the License Server. This is optional you can change this as per your choice or can keep the default. as shown below. After selection of folder click on
Next button.
Setup will now ask you for the
License File Location.
Copy your License File on the Desktop and click on
Browse button and select the License File copied by you on Desktop. Then click on
Next button.
Now the License Server is ready to be installed. Just click on
Install button as shown below.
The installation will begin and setup will copy the required file to the specified folder.
The installation will take around one minute (It depends on your computer/Workstation Hardware).
Click on the
Finish button to finish the installation.
Now click on the Exit button on NX 8.0 Software Installation menu to finish the installation.
At this moment you have completed the NX 8.0 installation & License Server installation. If everything goes right the n you have to just Restart your computer. After restart try to launch UG NX 8.0 from the All Programs menu in Windows 7 by clicking on NX 8.0
If the installation & Licensing was fine then the UG NX 8.0 will start up and run.
If there is a problem in start up or any error line License Server Down or License Server not Started or License file in configured at wrong port etc.........in That case you have to reconfigure the License File & Server manually. For this go to the NX Licensing Tools and Click on Lmtools.
Now you have to run the lmtools.exe (You can do this by following methods)
- Start->All Programs->Siemens NX 8.0->NX Licensing Tools->Lmtools
- Start->Run->C:\Program Files (x86)\UGS\UGSLicensing\lmtools.exe
- Go to the above shown file location and double click on lmtools.exe
Now follow the below precess to configure license services:
First of all you have to find that whether the License Server is running in background or Not? You can check this by going to the Stop/Reread Tab. If the license server is running then check-mark the Force Server ShutDown and click on Shut Down Server.
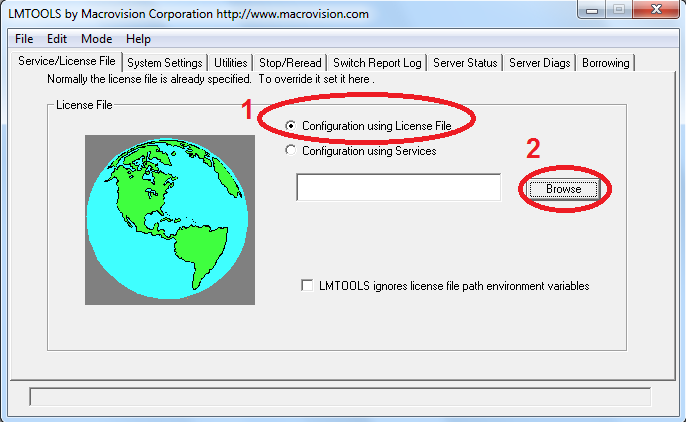
- Now go to the Service/License File Tab and Select the option Configure using License File.
- Select the License file from the location : C:\Program Files (x86)\UGS\UGSLicensing\ugs4.lic by clicking on Browse button.
- Now again go to the Service/License File Tab and Select the option Configure using Services.
- Now go to Start/Stop/Reread Tab.
- Now click on Start Server Button and exit the lmtools.exe by clicking on the cross mark on upper right hand corner.
Now try to launch UG NX 8.0 from the All Programs menu in Windows 7 by clicking on NX 8.0
I hope this will help you to Install & Configure the UG NX 8.0 on your computer. If need any further help then leave your comments.
Or if you have downloaded a cracked or pirated software then you have to follow the installation & configuration procedure as described in the downloaded UG NX 8.0