Hi CAD HELP CENTER readers there are some of the hotkeys of Solidworks 2010 for Windows 7 to improve your working speed.
Hotkeys
•WIN + Up Arrow or WIN + Down Arrow = toggle between window states, Maximized,
Restore and Minimized
•WIN + Shift + Left or Right Arrow = move window to another monitor
•WIN + 1, 2, 3, 4 or 5 = Launch the corresponding application on the Task Bar
•WIN + P = Projector and video output settings
•WIN + X = Mobility Center – Several convenient controls such as projector, WiFi, etc.
•WIN + T = Task Bar navigation via arrow keys
•WIN + D = Show Desktop
•WIN + E = Windows Explorer
•WIN + L = Lock Windows
•WIN + “+” = Magnifying Glass
•Win + Tab = cycle through the open application using Aero Flip
•Alt + Tab = cycle through the open applications
•Ctrl + Tab = cycle through the open documents within an application
•Ctrl + Application Icon = cycle through the open documents within the application
•Ctrl + Shift + Application Icon = Run application as Administrator
•Shift + Application Icon = Run a new instance of an application
•Alt + F4 = Terminate the active application
•Ctrl + Shift + Escape = Windows Task Manager
•Ctrl + C = copy
•Ctrl + X = cut
•Ctrl + V = paste
•Ctrl + Drag = copy
•Shift + Drag = move
Performance Settings
•Windows 7 has been designed for 64bit. Running the operating system as a 64bit OS
will give you performance gains as well as access to unlimited memory.
For applications not supported on 64bit, try Windows XP mode.
•You can monitor RAM, Processor and Video performance via the Resource and
Performance Monitor. To access type “resource” or “performance” in the Windows
Search bar.
•Turn off “Eye Candy” if performance is suffering. Right click on the Desktop and
choose Personalize. Under Themes, choose Windows Classic or Windows Basic.
•Tune the Power Settings to suite your working environment. Set your screen saver and
sleep settings to longer durations so you do not have to constantly wake the machine.
•For faster shutdowns, you can change what the power icon does. Right click the Sleep,
Shutdown, Hibernate button and choose properties. There is a drop down menu where
you can change its default functionality.
•Completely disable Hibernate. Access the Command Prompt and type
powercfg /hibernate off.
•With SATA drives you can turn on write caching to gain a performance increase.
However, make sure that you are running either a laptop batter or UPS to avoid
data loss.

Wednesday, May 19, 2010
Saturday, May 1, 2010
Step by Step Installation Process of UG NX 7.0 x64 bit on Windows XP x64 bit.
Dear CAD HELP CENTER readers as we all know that last year in September 2009 Siemens PLM Software is proudly introduced NX 7 in market. From the same day everyone is in search to get this latest NX 7 with HD3D tools & Synchronous Technology and now I have got this and hope so you also have got it.
The new version of UG NX 7.0 is available for both Windows x32 bit and x64 bit platforms.
The full package is a combined bundle of multi modules includes Solid Modeling, Sheet metal Designing, Surface Designing, Digital Mock-Up (DMU), Kinematics, Finite Element Analysis, Machining, Circuit Designing and many more.....
You are at right place if you are searching to get help regarding installation of Unigraphics NX 7 or can say UG NX 7. This guide will help you to install and configure license file for UG NX 7 on Windows XP x64 bit.
So get ready to know how to install or configure UG NX 7 in Windows XP x64 bit.
Here in this post I am describing my experience of installation of UG NX 7.0 x64 bit on my desktop computer in Windows XP Professional x64 Edition Service Pack 2. First of all I want to share with you that whatever media I have got is saying that Files on this media are intended for use on the Windows XP 64 Bit platform only. So I am not conformed till now whether this will work on Windows Vista X64 bit or Windows 7 x64 bit. I will check this in near future and if you need this then you can just check at your end or you can leave your comments.
After complete installation of UG NX 7 x64 bit on my computer I realize that the overall process of installation is very easy.
So First of all mount the DVD in the drive and run the Launch.exe. This will Show you the NX 7.0 Software Installation menu. From here you can View Documentation, Install License Server, Install NX or can get Composite Host ID.

Now click on Install NX. This will start the installation of unigraphics NX 7 on your Computer or Laptop or Machine.Now you have to Choose Setup Language. The default language is English but you can select your choice.(Currently UG NX 7 is supporting Chinese Simplified & Traditional, English, French, German, Italian, Japanese, Korean, Russian and Spanish) This is only Setup Language.

Now you will see the Welcome to InstallShield Wizard for UGS NX 7.0.
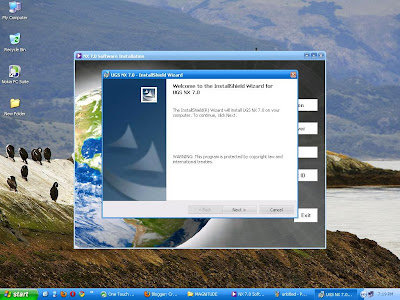
Now Click on Next Button. This will Show you Setup Type Menu.

Select Typical and Click on Next button. and you will see the Destination Folder Menu.

Keep the Destination Folder as it is and Click on Next button. This will show you Licensing Menu and ask you to Enter Server Name or a License File.

This will be like 28000@complete_name for my Computer or 28000@Your Host Name for your computer. You can check your computer name Here. This will show you NX 7.0 Language Selection menu.

Select the Language in which you want to install the UG NX 7. This is the Language in which program will run after installation. English is Default one, you just select yours and then Click on Next Button.


Now your program is ready to launch. just go to:
Start->All Programs->UGS NX 7.0->NX 7.0

Hope that this will help you to install and configure the new version of Unigraphics (UG NX 7.0)
If any query or feedback or suggestion, then let me know via comments.
The new version of UG NX 7.0 is available for both Windows x32 bit and x64 bit platforms.
The full package is a combined bundle of multi modules includes Solid Modeling, Sheet metal Designing, Surface Designing, Digital Mock-Up (DMU), Kinematics, Finite Element Analysis, Machining, Circuit Designing and many more.....
You are at right place if you are searching to get help regarding installation of Unigraphics NX 7 or can say UG NX 7. This guide will help you to install and configure license file for UG NX 7 on Windows XP x64 bit.
So get ready to know how to install or configure UG NX 7 in Windows XP x64 bit.
Here in this post I am describing my experience of installation of UG NX 7.0 x64 bit on my desktop computer in Windows XP Professional x64 Edition Service Pack 2. First of all I want to share with you that whatever media I have got is saying that Files on this media are intended for use on the Windows XP 64 Bit platform only. So I am not conformed till now whether this will work on Windows Vista X64 bit or Windows 7 x64 bit. I will check this in near future and if you need this then you can just check at your end or you can leave your comments.
After complete installation of UG NX 7 x64 bit on my computer I realize that the overall process of installation is very easy.
So First of all mount the DVD in the drive and run the Launch.exe. This will Show you the NX 7.0 Software Installation menu. From here you can View Documentation, Install License Server, Install NX or can get Composite Host ID.
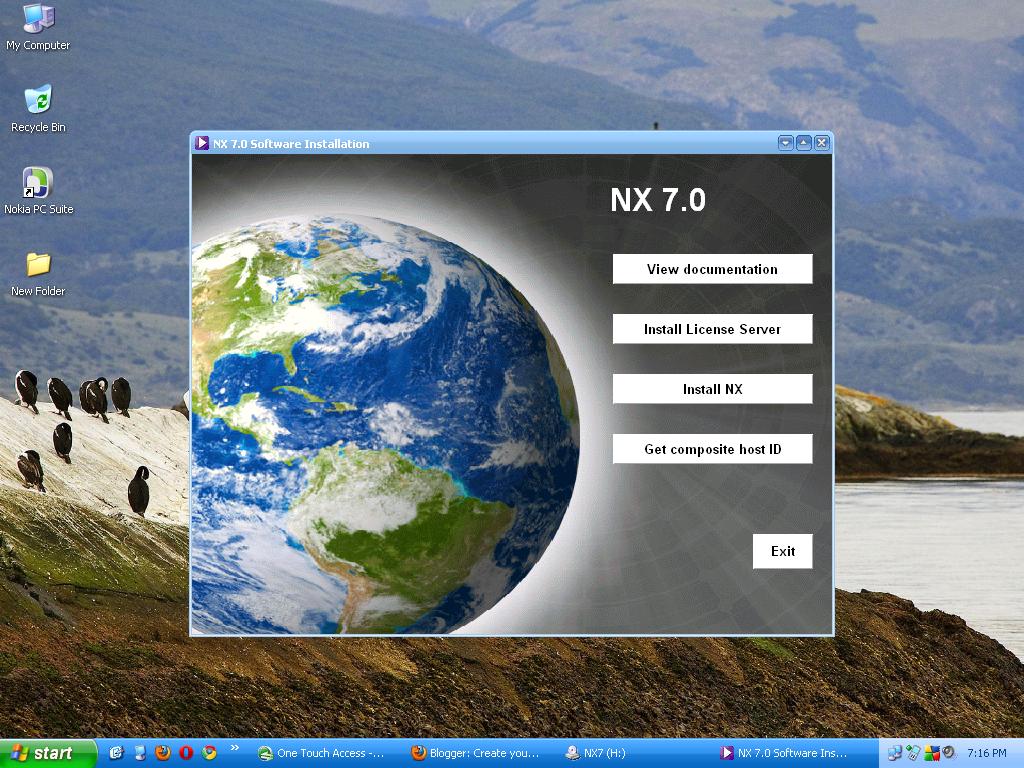
Now click on Install NX. This will start the installation of unigraphics NX 7 on your Computer or Laptop or Machine.Now you have to Choose Setup Language. The default language is English but you can select your choice.(Currently UG NX 7 is supporting Chinese Simplified & Traditional, English, French, German, Italian, Japanese, Korean, Russian and Spanish) This is only Setup Language.

Now you will see the Welcome to InstallShield Wizard for UGS NX 7.0.

Now Click on Next Button. This will Show you Setup Type Menu.

Select Typical and Click on Next button. and you will see the Destination Folder Menu.

Keep the Destination Folder as it is and Click on Next button. This will show you Licensing Menu and ask you to Enter Server Name or a License File.

This will be like 28000@complete_name for my Computer or 28000@Your Host Name for your computer. You can check your computer name Here. This will show you NX 7.0 Language Selection menu.

Select the Language in which you want to install the UG NX 7. This is the Language in which program will run after installation. English is Default one, you just select yours and then Click on Next Button.

After that the setup will ask you to review or change the Installation Setting. If the setting is OK then click on Install Button or if anything wrong then click back and repeat the above process to reset all.
After Clicking on Install Button the Setup will start Installing UGS NX 7.0.

After installing the Setup will show you the InstallShield Wizard Completed. Now Click on Finish.

Now you have to Configure your License File to run the UG NX 7.0, so for this Copy your License File in the UGS installation Directory. This will be C:\Program Files\UGS\NX 7.0\UGFLEXLM

Now you have to run the lmtools.exe (You can do this by following methods)
- Start->All Programs->UGS NX 7.0->NX Licensing Tools->lmtools
- Start->Run->C:\Program Files\UGS\NX 7.0\UGFLEXLM\lmtools.exe
- Go to the above shown file location and double click on lmtools.exe
Now follow the below precess to configure license services:
- Go to Config Service Tab.
- Enter Service Name (Like: UG NX 7.0)
- Click on Browse Button and select the lmgrd.exe file. ( The path should be like : C:\Program Files\UGS\NX 7.0\UGFLEXLM\lmgrd.exe)
- Click on Browse Button and select the License File. ( The path should be like : C:\Program Files\UGS\NX 7.0\UGFLEXLM\nx7.lic)
- Click on Browse Button and select the Debug Log File. ( The path should be like : C:\Program Files\UGS\NX 7.0\UGFLEXLM\log.txt) (If the file is not in directory then you can make a new text file with log.txt name.
- Check the Use Services.
- Check the Start Server at Power Up.
- Now Save the Services by pressing the Save Service Button.
- Now go to Start/Stop/Reread Tab.
- Check the license services installed on this computer. This should show you UG NX 7.0.
- Now click on Start Server Button and exit the lmtools.exe by clicking on the cross mark on upper right hand corner.


Now your program is ready to launch. just go to:
Start->All Programs->UGS NX 7.0->NX 7.0

Hope that this will help you to install and configure the new version of Unigraphics (UG NX 7.0)
If any query or feedback or suggestion, then let me know via comments.
Subscribe to:
Posts (Atom)